Showing posts with label Asian make up tutorial. Show all posts

October 26, 2017

Cheap Oval Brush - Does it works?

Another long overdue post!
It's a beauty post time and I think you might wants to know if the cheap oval brush that you can buy in Amazon for like $10+ for the whole set, works?

This is my before basic makeup.
I wore contact lenses, faux lashes and eyeliner to save some time in testing the brush.

This is my after..

..and this is the kind of cheap oval brush I use..watch the video and let know what do you think of this cheap oval brush. Do you think it works?


July 22, 2014

Video Tutorial: Casual Make Up

Olla ladies, just a quick one to share my video make up tutorial :)

Hope this one will help you to have an idea on how usually I do my casual make up. This time round, all the 24H make up products are sponsored by Tokyo Luxey.


Let me know what do you think if the video and what will be the next video you are looking forward to see ^^

'Till next time.
 photo signature-lips.png

June 25, 2014

How to create powerful make up with simple items?

Hello ladies!

I am sharing up my little guidance especially for you who standing in front of make up counter and wondering what to buy to create a powerful make up. You can actually stock up many foundations, blushes, eye shadows and as much lipsticks as you like - but if you are not that kind of person, I hope i can share my basic tips on getting make up stuff.

Let's start this, shall we?
Oh, this is how I look like without make up:


Sometimes, I want to create my right side look for a business meeting, event, or maybe my son's friend birthday party. You know, just to avoid the " just wake up " look on my face :)

and on the other time I am loving a glamours look for a date night with le hubby. 

But If you are not fancy a strong eye make up, you can always go for a casual look and tone down the lower liner..Just like my daily look as below. 


Too troublesome for make up? Don't close my blog just yet, because I am going to ask you if you know that actually with just using 6 make up items, you are pretty much good to go?

As simple as this 6 basic items:
1. BB cushion/Pressed powder
2. Eyebrow pencil
3. Cheek tint
4. Faux lashes
5. Soft colour lipstick
6. Eyebrow powder

Another secret to create a bigger eye illusion is by using a circle lens - I am using Freshkon in grey.
The other key element for a bigger eyes is faux lashes. I am using one of my favourite brand - Starlash in DB 31 to create the look. 


But before sticking the lashes, I like to start my make up by drawing my eyebrow.
I am using both, pencil and eyebrow powder to define eyebrow.

One easy trick to draw eyebrow is to draw the outer shape according to you preference, then fill it up using the eyebrow powder. 
Then I stick the faux lashes continue with applying my ETUDE Magic BB cushion as my make up base.
You can read more about this product on my previous review -> HERE

As for the cheek and for the super long lasting cheek tint, please go for Estee Lauder in Hot fuse.


This is one of my favourite cheek tint and i recommend this to so many people around, because it just that good.

For the eyeshadow, go for basic earth tone if you are not sure what to get as the first timer.
I recommend Jane Iredale Magic Hour collection eye shadow in trio golds.


In this look, I am just using single color - the right side beige color on my eye lid.
Can you see how smooth and pigmented is the color? I don't have to even blend it with brush, am just using my finger tip :)


The lips - I go light with a soft pink hue from Candy Doll collection.
This is a Japanese brand that I recently bought during my trip to Tokyo.

If you love bold and strong looking eyes..add on a solid black eyeliner on your lower liner.
It will create a dramatic effect on your eyes - although I must say that this may not suitable for daily look and not everyone could carry the look. So, apply the black liner wisely, yeah?

I recommend Make Up Forever Aqua black eye liner.
It's waterproof and it stays on the waterline as well.


Next tips, still with the 6 basic items + 1 black eyeliner ..and you want to create a glamour diva look?

Easy - pick a hot red lipstick to complete the basic make up collection and you are pretty much good.
You can play around with the basic look..and spice up your look with just the red lippy :)

I am still using the same make up, the difference is only at lip color.
See how one bold red lips could change the whole look?

Using Bobbi Brown in Old Hollywood 2
I hope this tips could be useful and if you have questions on make up or some tutorial request..you know how to reach me!

'Till next time :)

 photo signature-lips.png

June 22, 2013

Make up tutorial: ROM make up :)

Olla ladies and bride to be, 
Am now sharing a little tips of how I usually do ROM make up :)
- Just in case, you are new to my blog..I am a certified professional make up artist that creates beauty in Make up By Bubbly Brush -

I was inspired by few blogger friends that about to get married soon and few make up clients that I have to turned down because it will be too near to my due date. So, I was thinking..to share my tips and trick for you to see of why do you need professional MUA to help you on the big day :)
Or maybe considering of doing your own make up! why not?

This is me, without make up :)
I know, I don't look good..although I would say I have a good skin as a canvas to begin with.
...and if you would like to know what did I do to my skin apart being a religious SK II user for 5 years, I also do my facial at home

On this post and the next post of my ROM hair tutorial, I am gonna show you a step by step to transform my before to the me after make up as photos below:
No photoshop in making my face look smaller and sharper, I use shading powder to contour my face and the rest is my angle in taking photos.

For ROM make up, you would want something fresh, light looking and most importantly comfortable on your skin, and this is why you should avoid many layers of foundation to cover your flaws.

Always: Conceal.
Take concealer, colour corrector of even the Kryolan TV stick in ivory like I use to cover up any flaw.

I always start my make up with a even skin tone.

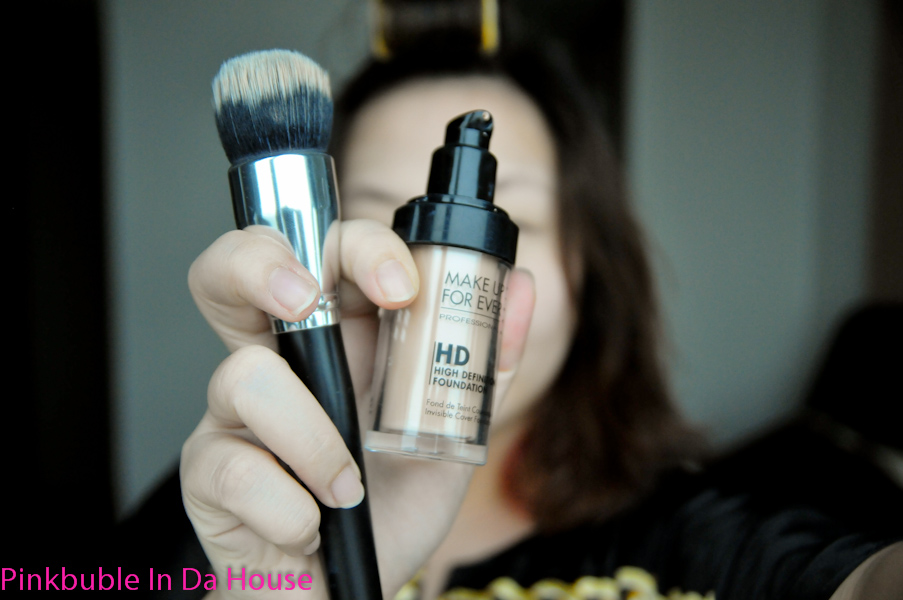
Always: Invest in a good foundation.
Oh yes, a good foundation would make your skin look flawless, and safe your time in creating a good smooth base that you want for your special day.

It's totally up to you if you want to use your hand (just make sure it's clean) or a foundation brush to even out the foundation on your face.

Always: Powder up after your foundation.
Unfortunately, we are not staying in a country that will leave us happy to go without powder up our skin after the foundation. You definitely want to keep your foundation in place to keep you going at least 4-5 hours to host your guest and photo taking session. So yeah, powder up.

Always: Contour your face.
Especially if your face are like mine - contour-less - you need contouring/shading powder to just give a subtle " mark " to name cheekbone and/or nose bridge.

For ROM make up, I don't usually go for a cream shading technique as I do for Bridal lunch or dinner day.
Let's keep it light remember?

A little on the temple, nose bridge, under the cheekbone and below the chin are some areas that will do you a lot of favour when you are taking photos. 

Always: Get a right blush colour

My skin tone is Ivory with a little pinkish tone under the sun, and I love how it looks on my skin..so I go for the pale pinkish tone for my look.

Swipe it along the cheekbone and NOT on the apple of the cheek. 
*We are not 5 y/o kindie in school performance.*

You might wondering, why I am start with blush before eye make up?
Everybody has their own way to do make up, just like when you shower..some start from the head to toe, some goes for body then the head. *I'll go the 1st one - if you care to know * :P

One thing that I always share to those who are enrolled in my private make up class, having your blush done before your eye make up works as your gauge to know how strong you want your look to be. Have you ever start with your eye make up, then you think " ah perfect! " so you finished the look with your blush and lips, and suddenly you look " Too much " ? 

Did you just nod? If you do, you might want to try my blush before brows technique. :D

Always: Trim your eyebrow neatly.
Nope, not thinly..but neatly.


Use eyebrow powder to create a softer and natural look on your eyebrow.
It just so passe' to have a nicely drawn inked eyebrow like our Momma time.


Always: Frame your eyes
Either with pencil/gel/liquid eyeliner..just frame it to define your eyes.

Extend the eyeliner to creates an illusion of a bigger eyes.
Oh, I forever use this illusion to enhance my eyes.


Next, if you have a short and fine natural lashes..you can skin the part where you have to curl your natural lash and go straight to the faux lashes.

Currently loving Starlash Kawaii TL 010 type of lash :)

But If you do have a long lashes, please..do me a favour in curling your eyelash first. :P
It's very annoying to see faux lashes going up curl while your natural lashes pointing down.

" I'm scared of eyelash curler!! "
..oh, I get this a lot whenever I am about to curl my client lashes with the normal lashes curler.

So now, let me introduce to you this lovely 
Panasonic Heated Eyelash Curler EH-SE60
More info: Panasonic facebook


It's so safe, easy to use and pretty much you just need to spend at least 1 mins per side to creates a gorgeous uplifting lashes.

It comes with heated 360 degree rotating comb and run in AA battery power.


Once you get the desire lifted lashes, let's stick our faux lashes :)

Always: Use a good eyeshadow.
Why? because it might safe your time in picking up the pigment and blending it smoothly.

As you see, I am applying " silly " colour on my entire lid below the crease and mix it with "serious "colour on the 1/3 outer part of it.

and blend it with my blending brush after dippin' it to natural eyeshadow colour.
That's pretty much all for the eye make up, pretty easy right?

As for the lips, I bet ROM won't be too much of " Wedding kiss! " and " You may kiss the bride " , so I still put a kissable natural colour gloss to my client for ROM. Although, if you prefer to go matte - that is completely fine.


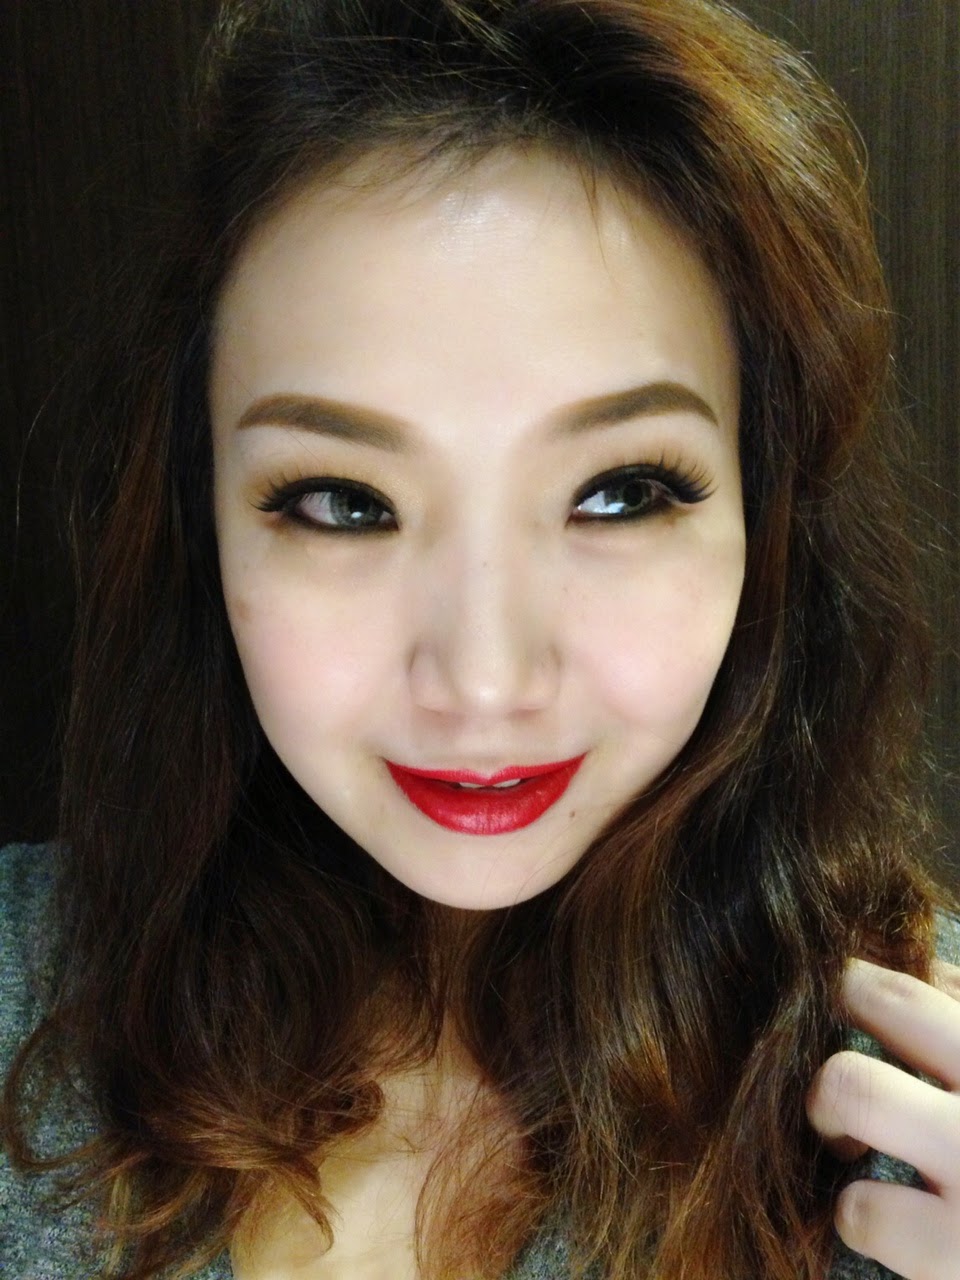
Here is the final look of my ROM make up tutorial :)
Fresh, light and still do the magic of make up!

Stay tuned for the next ROM hair tutorial :)

February 21, 2013

Natural look make up tutorial [Video]

Hellow ladies..am sharing up another natural look tutorial that I think suitable for your daily look :)
No fake eyelash, no shading technique, only tons of Mascara to apply. I was requested to do this tutorial from Cindy, one of my readers in Indonesia.

She has problem in applying fake eyelash for her make up, and she would like to look good without it..well of course, with Maybelline mascara, you can achieve the [almost] fake eyelashes effect without even wearing one.

These are the awesome mascara I received from Maybelline Indonesia, OMG! they are just super generous in sharing up their products. I am pampered.
 photo 59003431-7149-4B3A-A0BF-6B2AEE72A982-5825-000007720DCB29D4_zps4c593ca4.jpg

And not only that, Maybelline Indonesia also sent me this lovely eyeliner..
 photo photo5_zpsb10bad7d.jpg

And this gorgeous colours of Diamond Glow and Hyper Glow collection!
 photo photo4_zps91dbf8e3.jpg

And today's tutorial, I'm gonna use mostly Maybelline products - except my eyebrow powder (by NYX)
Well, actually..you can just use  anything you have at home to create this look..it's easy, light and hopefully you like it ^^


One of the trick to create a natural fresh looking make up is a healthy and glowing skin to start.
So, don't forget to keep moisturised your skin, mask it twice a week, ampoule it if you have to, and exfoliate it once a week to remove the dead skin :)

 photo ED9BFEFE-13CF-40FB-91F6-7CF3BC73FE03-5825-0000075F1CC171D3_zps392c39a6.jpg

Have a nice day and stay glowing :)
 photo photo3_zps28c07799.jpg

LinkWithin

Related Posts Plugin for WordPress, Blogger...